What you need to know before hand
When you heat to look for the right kitchen sink size, there are certain basic things that you will need to get yourself acquainted with.
When it comes to selecting a perfect size kitchen sink, you are spoiled for choice. There are many shapes, depths, materials, bowls, faucets & drain options, and the list goes on. With so many choices available, odds are that you end up buying something that may not be meant for you. So, how do you fix that?
Read on to find outA sink is arguably one of the most used fixtures in the kitchen. That’s why it’s essential to invest a considerable amount of time to choose the right kitchen sink size.
If you’re replacing an existing kitchen sink and not the counter, the size of the sink is predetermined. However, if you’re replacingthe entire sink counter, you have the freedom to select the best size. Feeling overwhelmed? Don’t worry. At Kralsu, we help you select the right sink for your kitchen.
When you heat to look for the right kitchen sink size, there are certain basic things that you will need to get yourself acquainted with.
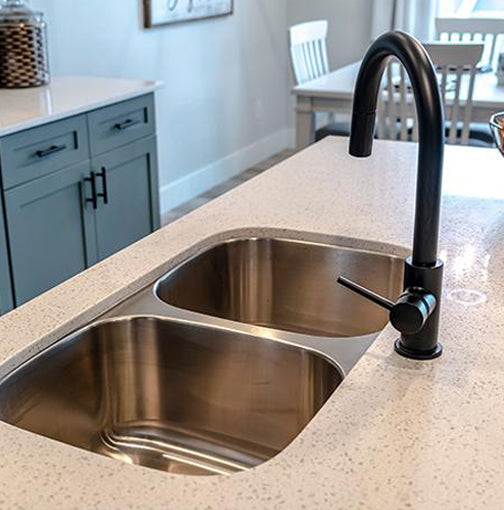
A Kitchen sink is a bowl-shaped plumbing fixture that is usually used for washing dishes, vegetables, hands, and other purposes.
These can have single or multiple faucets that provide cold and hot water. These faucets may or may not come with a spray feature for quick rinsing.


There are a variety of sinks available in the market. You can choose according to the:
Always consider your kitchen size while selecting the size of your sink. For a small kitchen, where space is at a premium, installing a small sink means more counter area.
Even if space is not an issue, make sure that the sink is proportionate to the overall kitchen layout.


To determine your maximum sink size, you’ll need to consider the size of the base cabinet. Standard kitchen cabinets are 36″ to 42″ high, 25 1/4″ to 26″ wide, and 24″ deep.
A large-sized kitchen sink on a small base cabinet will reduce the overall cabinet space.
Just like the kitchen size, consider the size of surrounding elements too. Check out the nearby fixtures—stove, counter, cabinet detailing, accessories, and the like.
Measure these fixtures to find out if your kitchen sink will look proportionate.


Before you decide on a kitchen sink size, consider the average use of your kitchen sink. Also, take a closer look at your cooking and cleaning habits.
Depending on your cooking and washing style you can select the right size for your kitchen sink.
There are a number of sink-size options available for your kitchen. The dimensions can vary from 9-inches to 40-inches in length. To identify the right sink size, you need to find out:
Important Note: According to experts, your kitchen sink should be at least 22–27 inches wide.

The standard kitchen sink dimension measures 22x30 inches. Due to the size of most cabinets and countertops, the front-to-back dimensions of the sink remain standard.
The average depth of kitchen sinks varies from 8–10 inches.
Shallow sinks are easy to reach and take up less space. These are easier to install than other sinks and offer easy access to the garbage disposal and plumbing fittings.
Deeper sinks offer more space to soak pots and pans. However, these can be uncomfortable to use for tall people.
Important Note: While selecting the depth, keep in mind that undermount sinks sit around 2-inches lower than the topmount sinks.
It will add 2 more inches to the existing depth of the sink. This can make the bottom of the sink more difficult to reach.
Depth is one factor, but you also have to consider the width of the sink
The standard kitchen sink width & length can vary dramatically. Depending on the number of bowls, the sinks come in different standard sizes.
Narrow trough sinks are specially designed for small spaces. Ideal for easy food preparation, these sinks generally measure 8–14 inche front-to -back. However, these can stretch up to 50 inches or wider.


A 24-inch kitchen sink is ideal for small kitchens. It is big enough to handle large dishes and still leaves ample space on the kitchen counter.
It is available in a variety of edges, depths, gauges, and styles (Undermount, Topmount/Drop-in, Apron style)


A 27-inch kitchen sink is one of the most common sink sizes. It is big enough to add a cutting board or various other accessories without hindering its primary function.
It is available in a variety of edges, depths, gauges, and styles (Undermount, Topmount/Drop-in, Apron style)


A 30-inch kitchen sink is the second most common sink size. You have the option to choose from a single or double bowl sink.
It is available in a variety of edges, depths, gauges, and styles (Undermount, Single/Double bowl, Topmount/Drop-in, Apron style)


A 36-inch kitchen sink is a great choice to have in your kitchen. It is one of the biggest kitchen sinks suitable for big countertops.
It is available in a variety of edges, depths, gauges, and styles (Undermount, Single/Double bowl, Topmount/Drop-in, Apron style)
Products of 36 inch Kitchen Sink
There are a number of sink-depth options available for your kitchen. The depth can vary from 6-inches to 10-inches. To identify the ideal sink depth, you need to consider the following:
Important Note: According to experts, your kitchen sink should be at least 7–7.25 inches deep.

A 7-inch deep sink is the most preferred kitchen sink. It is deep enough to carry large dishes and pots.
It leaves ample space below the sink for easy installation of the drain pipe and various other accessories.


A 9-inch deep sink gives ample space for your dishes. It is deep enough to prevent any splashing while doing the dishes.
Products of 9 inch Kitchen Sink

A 10-inch deep sink makes it easier to soak big pans and pots. However, it can be uncomfortable for very short as well as very tall people to use.
Products of 10 inch Kitchen Sink
It is possible to replace your old kitchen sink and install a new one without destroying your countertop. By following the steps mentioned below, you can learn how to install a kitchen sink like a pro.

Turn off the water supply lines (hot & cold). If you cannot turn off the water supply of your sink, turn off the main water supply of your home.
Disconnect the water supply lines attached to the faucet. Make sure you put a bucket beneath the water supply lines to prevent the water from spilling.


Turn off and unplug the garbage disposal (if you have one). Remove it as per the instructions provided by the manufacturer.
Remove the caulking/silicone around the sink. Do not remove the supports of the sink until the seal of the sink is broken.
Once the seal is removed, carefully remove the supports to remove your undermount kitchen sink.
Remove the flanges around the rim of the topmount kitchen sink. These flanges keep the sink from falling through the hole cut in the countertop


Remove the sink from beneath the kitchen countertop by sliding it out.
For concrete or stone sink, you'll need power-cutting machinery to remove it.
Push the sink from beneath and carefully lift from above the countertop.
Clean the residue grime, caulking, and silicone to ensure a smooth kitchen sink installation.
It is recommended to use new fixtures when you are installing a new kitchen sink.
However, if you are considering using the existing fixtures, clean them before reinstalling them.

Before installing a new sink in your kitchen, make sure that the sink fits underneath/into the existing countertop. However, if you are using a new countertop, you must cut a custom hole for your new sink.

Slide the sink beneath the existing counters to make sure that the new sink will fit under the counter.
Drop the sink over the top of your existing counters to confirm that the new sink will fit on the counter.
Set the sink upside down to install fixtures and any other sink-related components.
Feed the supply tubing of the faucet through the rear end of the sink and seal the faucet. Screw the washers and mounting nuts to the bottom of the sink deck.


Use the plumber's putty to fix the strainer/drain assembly to the sink. Firmly press to secure its position and remove any excess putty in the basin of the sink.
Use the rubber gaskets to tilt the sink on its side. It allows you to secure the flange to the underside of the drain.
Important Note: Always use high-quality putty for kitchen sink installation. It ensures the long life of the sink.
If the kitchen sink has clips, turn the clips inside toward the bowl of the sink. And if the sink doesn't have any clips, simply drop/slide the sink over/beneath the counter.


Use high-quality silicone caulk to create a watertight seal between the sink and the countertop. Clean off any excess caulk that oozes out during the kitchen sink installation.
Apply an even amount of silicone caulk on the perimeter of the sink. Attach the sink to the countertop from beneath and use support to seal it in place
Apply a bead of silicone caulk underneath the perimeter of the sink. Drop the sink over the countertop opening and attach it to the countertop.
Connect the faucet to shut-off valves using braided stainless steel hoses or acorn-head supply tubes.
Attach the water sprayer hose to the threaded tailpiece of the faucet (optional). Reattach the water connections and connect the drain pipes.


Your sink is now installed. Turn on the faucet and let it run for several minutes. Completely fill the sink with water.
Check for leaks around the faucet, plumbing, tubing, and drain locations.
Simply letting the water run down the drain of your sink will not clean your sink. It needs regular maintenance to prevent the growth of harmful bacteria and germs. Follow these step-by-step processes to keep your kitchen sink clean and sanitized.
Depending on the material, kitchen sinks require different cleaning processes for deep cleaning.


Don't forget to clean those hard-to-reach spaces—faucets, spray nozzles, and sink strainers.
White vinegar is a great disinfectant that effectively kills common germs. It cuts grease and also acts as a deodorizer.
For copper & other materials that aren’t vinegar-safe, use a mix of hot water and non-acidic antibacterial soap.


Don't forget to clean your sink accessories—wire sink grids, sink buckets, straners, and the like
It depends on whether you are replacing a sink on the same counter or installing a new counter.
If you are replacing a sink on the same kitchen counter, your sink size options are limited. It is because holes have already been cut to accommodate the old sink. The new sink has to be the same size as the old one. You also need to consider the cabinet space under the sink.
If you are installing a new kitchen counter, you have more options to customize your kitchen sink. However, you still need to consider the cabinet size under the sink.
Free ground shipping to MD, VA, PA, and NC. Shipping cost to other states may vary from $15-$50